Onion-Topped Focaccia Bread
I don’t know what it is about focaccia, but I feel like it’s one of the most decadent breads ever. Maybe it’s the olive oil or the rise time that gives it such a rich, complex flavor and texture. Whatever it is, focaccia is a real winner at the dinner table.
It comes with an extra bonus, too. The dough gets around four hours of total rise time, and can I just tell you that your entire home will smell absolutely amazing. Whenever I make this bread, I usually run out to do errands while it’s rising. When I come home and open the door, the aroma is like a wonderful hug embracing me, filling me with joy. Sometimes I just close my eyes and inhale deeply, letting my senses experience the wonder that comes from the combination of just a few ingredients.
The nice thing about focaccia is that you can keep it simple. Just a sprinkle of sea salt on top will give you the perfect bread for dipping in your favorite olive oil. But when sweet onions, such as Vidalias or Walla Wallas, are in season, they’re hard to resist. I love the way this recipe takes advantage of those flavors.
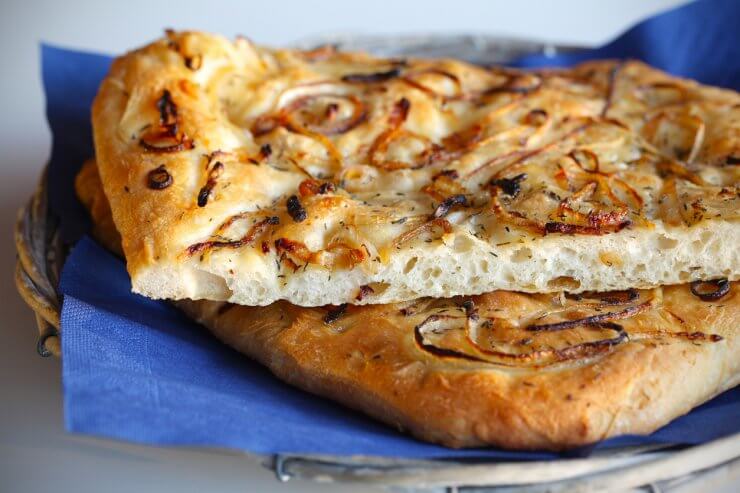
This onion-topped focaccia bread is dressed to impress. Top a simple, versatile dough with your choice of onions for a flavorful bread that looks like you spent way more time working on than you really did. If you have a bread maker, you can have it mix the dough for you; then all you have to do is press it into your baking pan, let it rise, then bake it to perfection. If you’re feeling really inspired, you can try your hand at making the top look a little artsy—make some patterns, even add some other toppings to create a scene. Let your imagination soar!
Print
Onion-Topped Focaccia Bread
This onion-topped focaccia bread is always a hit. Topped with fresh, sweet onions and rosemary straight from the garden, it’s a flavor sensation that is sure to please.
- Prep Time: 15 minutes
- Additional Time: 4 hours
- Cook Time: 35 minutes
- Total Time: 4 hours 50 minutes
- Yield: Serves 8 to 10 1x
- Category: Bakery
Ingredients
-
- 4 cups all-purpose flour (or a combination of all-purpose, bread, and wheat flour)
- 12 ounces water
- 2 tablespoons olive oil
- 1 1/2 teaspoons salt
- 1 tablespoon sugar
- 1/2 teaspoon crushed rosemary
- 2 teaspoons yeast
- Optional: Garlic powder or minced garlic to taste
- Nonstick cooking spray
- For the topping
- 2 sweet onions, sliced thinly (optional: add a red onion to the mix)
- 3 tablespoons olive oil
- 1 teaspoon kosher salt
Instructions
- Mix together the dry ingredients in a large bowl (if using minced garlic, add it with the wet ingredients).
- Add the water and olive oil and stir until the dough begins to come together; the dough should be soft and sticky.
- Oil another large bowl; transfer the dough to the bowl and turn it so that it’s coated in the oil.
- Cover the bowl tightly with plastic wrap.
- Set bowl aside at room temperature (or inside a cold oven) until the dough doubles in size (about 3 hours).
- When the dough has risen, mix the sliced onion, olive oil, and salt in a bowl until the onion is coated.
- Lightly spray a 9×13-inch baking pan, and put the dough into it, stretching the dough to fit the shape of the pan.
- Use lightly oiled fingers to press dimples into the bread.
- Decorate the top of the dough with your onions (and any optional vegetables that inspire you—olives, dried tomato, etc.).
- Cover the pan with waxed paper and put a clean kitchen towel on top.
- Allow the dough to rise until it’s almost as high as the sides of the baking pan (about an hour).
- Preheat oven to 400 degrees F.
- Remove the wax paper and towel, then place focaccia in the center of the oven.
- Bake focaccia for 30 to 35 minutes, until it’s golden brown.
- Bread is ready when you hear a slightly hollow sound when you tap the top.
- Allow the focaccia to cool in the pan.
- Cut into squares for sandwiches or panini, or into strips for dipping in oil, hummus, or your favorite dip.
-
Bread maker option:
- Put wet ingredients in the bottom of the bread maker bowl.
- Add dry ingredients.
- Run bread maker on dough setting.
- Pick up recipe at Step No. 6.
Have you tried this recipe? The bread maker is helpful but not essential—please tell us how this bread turned out for you.


 Previous


Looks delish.. must give it a try????????
Yum