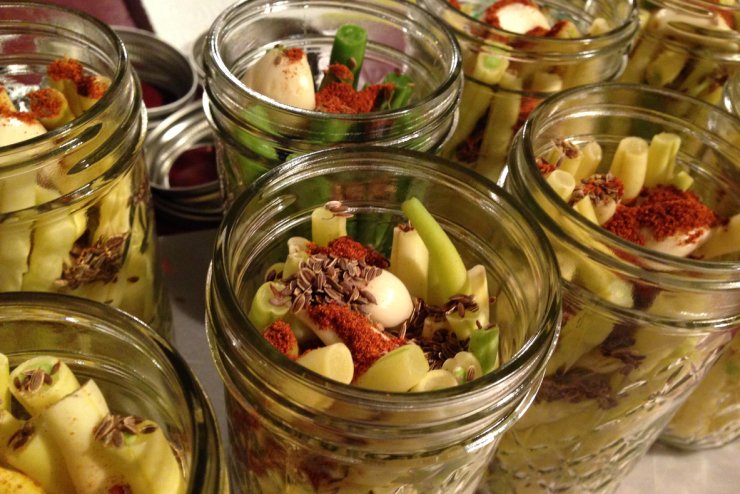
Dilly beans
So, are we canning here? No. It’s important to know the difference between canning and refrigerator pickling. Canning, a process that includes boiling jars filled with fresh ingredients until they are sealed, is a method of preserving produce. As long as you don’t open the jar, the food should be able to stay in your pantry, “shelf stable,” for up to a year without spoiling.
Refrigeration pickling involves preserving fresh produce with a brine including vinegar, herbs, and spices so that the vegetables last longer than if they were not preserved—but they must be kept cold. Refrigerator pickled produce will stay fresh from a few weeks up to three or even six months—but they usually get eaten before that!
The advantage of pickling over canning is that you don’t need to sterilize the jars—though they should be sparkling clean—and it takes far less time. In fact, the hardest part is leaving the jars in the fridge for two days to complete the pickling process before you can taste your new snack.
Here are some tips for successfully making Dilly Beans:
- Use clean Mason, or similar jars, with an opening smaller than the width of the jar. This will help keep the beans from trying to “jump” out.
- You can use any kind of green bean, but use the freshest possible—preferably from your own garden. Yellow or purple beans look pretty—though purple beans will lose some of their color in the blanching process.
- Try to select beans that are uniform in size and make sure the full length of the bean will fit into the jars you’ve chosen.
- Trim the ends of the beans and blanch them before pickling. To blanch, boil the green beans for 1 minute, and then drain and immediately put them in a bowl of ice water for 5 minutes to stop the cooking process. Drain the beans and set aside.
- You may snip the dill, insert a whole dill leaf, or both. But the whole leaf makes a pretty garnish.
Refrigerator pickling is a delicious and economical way of extending the life of your garden harvest, and these Dilly Beans make a wonderful gift for friends and family.
Print
Dilly Beans
What a delicious way to enjoy the dill and green beans you harvest from your garden! Eat Dilly Beans alone as a snack, as part of a charcuterie board, on burgers, in veggie sandwiches, and more. These Dilly Beans will stay fresh in the refrigerator for three to six months.
- Prep Time: 15 minutes
- Additional Time: 2 days 12 hours
- Cook Time: 5 minutes
- Total Time: 2 days 12 hours 20 minutes
- Yield: Serves 10 1x
- Category: Sides & Sauces
Ingredients
- 2 pounds green beans, ends trimmed
- 1 cup white vinegar
- 1 cup apple cider vinegar
- 1 cup water
- 2 tablespoons sugar
- 2 garlic cloves, halved
- 1 1/2 teaspoons kosher salt
- 1/2 cup onion, minced
- 4 sprigs fresh dill
- 1/2 teaspoon black peppercorns
- 1/2 teaspoon red pepper flakes, dried
- 2 small chilies, optional
- Additional: 4 1-pint clean glass jars with lids, such as Mason jars
Instructions
- Make your brine: in a saucepan, bring water, vinegar, salt, sugar, and garlic to a boil. Once it has boiled and the sugar has dissolved, remove from heat, set aside and allow it to come to room temperature.
- Blanch the beans: boil green beans for 1 minute, and then drain and immediately put in a bowl of ice water for 5 minutes. Drain the beans and set aside.
- In your clean jars, place onion, peppercorns, and red pepper flakes in the bottom. (Distribute evenly among jars.)
- Add your beans to the jars. Tuck some of the dill amongst the beans.
- Pour the brine over the beans, put a lid on them and keep them on the counter for 12 hours. Transfer to the fridge. Allow them to sit in the fridge for 2 days before consuming.
Notes
- Keep jars refrigerated. Dilly Beans prepared this way are delicious, but not shelf-stable.
Have you tried this classic summer treat? What’s your favorite way to make it? Please tell us how it turned out for you.


 Previous

