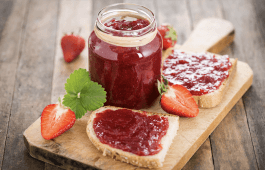
There are so many tasty edible gift ideas you can make from your garden: hot sauces, jellies, herb blends, salad dressings, teas, you name it! You can infuse vodkas by simply adding herbs and vanilla, and letting them marinate for a few days. You can create a fancy salt mix by combining dried rosemary with flaked sea salt, or you could infuse olive oil!
But let’s start with one of my favorite gifts we can all make very easily from the bounty of our gardens, and that’s jam. I’m going to start with strawberry jam, and then give you a list of recipes for other jams you can make at home. When you’re giving jam as a gift, I suggest canning and dating it, so you’ll learn how to not only make jam, but also how to can it as well.
1. Make and Can Jams as Gifts
We have so many recipes for jam at Food Gardening magazine, we have Freezer Jam, Pear Jam, even Gooseberry Jam! Oh, we have jellies too. I’m going to show you how to make an incredibly simple and can-able strawberry jam, pectin-free, that you can wrap a little bow around and call your own.
Print
Canned Strawberry Jam (Pectin-Free)
This canned strawberry jam recipe takes just 30 minutes to make and can be given as gifts, or brought to gatherings with a spread of crackers.
- Prep Time: 10 minutes
- Cook Time: 20 minutes
- Total Time: 30 minutes
- Yield: 5 small jam jars 1x
- Category: Breakfast
Ingredients
- 2 lbs strawberries
- 2 cups cane sugar
- 1 large lemon (zest + 1/4 cup lemon juice)
Instructions
- Sterilize your jam jars in boiling water in a stockpot, and get them ready to go. Keep this water rolling.
- In a bowl, mash the strawberries into 4 cups worth. Add to deep skillet or saucepan with sugar and lemon juice. Cook over low heat until all of the sugar is dissolved, then raise the heat to high and bring it to a boil.
- Stir almost constantly with a wooden spoon or a spatula, until it reads 220F on a candy thermometer. A visual trick to see if it’s ready is to run your spoon down the middle of the skillet. It should take a second or two for the mixture to come back together (watch the video for reference). This should take about 15-20 minutes.
- Pour the mix into your sterilized jam jars, leaving at least 1/4-1/2″ room at the top, and screw on top tightly.
- Lower your jam jars back into the boiling water, keeping the water bubbling over medium heat, making sure there’s at least an inch of water over the tops, and let process for 20 minutes.
- Remove from the water with a silicone spatula or canning tongs, and let sit on a towel on the counter. You’ll eventually hear the jars pop over the next hour or so, which means they’re sealed. You can also check them by pressing on the tops. If they pop back, they’re not sealed and they should be stored in the fridge, the others can be stored in the cabinet for about a year.
- When giving them as gifts, make sure you write an expiration date on them. I like to go with a safe date of 6 months, though they can last up to 12. Once opened, they are good for 3-6 months.
Other jam and jelly recipes:
- Freezer Jam
- Pear Jam
- Gooseberry Jam
- Grape Jelly
- Blackberry Jalapeno Jelly
- Quick & Easy Blueberry Jam
But jams are just part of the story. There are lots of other edible goodies you can make from the bounty of your garden, such as:
2. Edible Herb Bouquets
Bundle up a bouquet of rosemary, thyme and sage from your garden before arriving to holiday dinners, and the chefs will be most appreciative! At the very least, they make great table decorations.
3. Infused Vodka / Extracts
Infusing vodka is quite simple. All you need to do is immerse a spring or two of your favorite herb and let it marinate for a few days. Then, just strain it out, and you have yourself infused vodka which works great in cocktails, and because it’s alcohol, it’s quite sterile. Make your own labels and tie bows around the necks! You can also use this method with smaller amounts of vodka to make extracts to use in food, but it will take a week or two.
4. Hot Sauces and Sauces
Making hot sauce is a big topic, but here are some basic principles:
- Use a 3:1 ratio of sweet to hot peppers for a mild sauce, and increase from there.
- A good red hot sauce can be made by blending red bell peppers, (sweet) and cayenne peppers (hot).
- A green hot sauce can be made by blending green bell peppers (sweet), jalapeños, and poblano peppers (hot).
5. Vegetable Food Dye
In my How to Make Natural Dyes from Vegetables we used everything from golden beets to spinach to make food dyes of all colors that you can gift to be used for coloring eggs, frostings, cakes, and anything else your giftee desires. Refrigerate, and I would suggest that if used for anything uncooked like frosting, they should be used within 30 days, but for anything else, they last 6 months or more in the fridge. I’m still using the ones we made for that issue!
6. Rosemary Sea Salt
To make rosemary sea salt or any type of herby sea salt, simply combine dried herbs with flaked Malden sea salt. Just make sure your herbs are completely dry before combining them. Rosemary is my herb of preference for this use.
7. Flavored Olive Oil
Infuse olive oil with your favorite herbs by filling a nice cruet with olive oil to the top, then pouring it into skillet (this is so you know you’re only making enough to fill it). Add a handful of your desired herb(s) and cook them in the oil over medium-low heat for 10-15 minutes. Let sit to cool completely, then remove herbs from the oil for longevity. Add a spout that keeps air out, and tie it up with a bow and instructions to use within 30 days and to store out of the sunlight.
8. Teas, Herbs, and Spice Mixes
In my How to Dry Herbs video I shared how to dry different types of herbs for creating jars of dried herbs and teas.
- Herbal Teas – Garden-fresh teas are easy to make at the end of the growing season, and even into the winter. Add some dried orange and lemon peels into your batches for a fragrant twist.
- Spice and Herb Mixes – With an entire garden at your disposal, you can make gifts of herbs easily. Rosemary, thyme, sage, oregano all dry and store easily. Make sure your herbs are completely dried before storing them in jars for gifts.
- Poultry Seasoning: rosemary, parsley, sage, and marjoram.
- Italian Seasoning: oregano, basil, rosemary, parsley, thyme, and also often crushed red pepper—another fun project, but you’ll need a dehydrator.
- Herbs de Provence: fennel, rosemary, thyme, sweet basil, savory leaves, tarragon, chervil, dill, oregano, marjoram, and lavender.
9. Pickles
It was only a couple of months ago that I was sharing my deep personal love for pickling in How to Pickle: 3 Ways, and let’s be clear: pickled veggies make GREAT gifts. The best part is that you can make them all summer when your veggies are in season, and they’ll be ready to go for the holidays. Make sure to mark your jars with expiration dates (Personally, I generally go with a year to be safe with canned pickles, and a month for fresh vinegar-based pickles).
10. Marshmallows
Another favorite past-time for me was when we made Homemade Marshmallows with Chamomile together. And you don’t need to stick with just dried chamomile, you could steep rosemary, thyme, or rose petals from your garden to make all different flavors of marshmallows. Package them up and tie them with a bow in a basket with the herby firestarters I made in Crafty Gifts You Can Make From Your Garden.
11. Chicken Stock and Bone Broth
While this might not be a “tie it with a bow” kind of gift, your family will be happy to take on casual gifts of broth for use in all the holiday meals, leading up to the big days. To learn how to make a large batch, watch my video on Making Chicken Stock Using Garden Scraps.
12. Fruit Cakes
Sure, I know you’re thinking of the traditional fruit cakes with candied fruits that are definitely not growing in your yard, but my Candied Lemonade Cake Bread makes a gorgeous gift. It takes some time to make, especially to candy the Meyer Lemons that go on top, but it’s a beautiful gift to wrap and give to someone.
Your turn – what edible gift ideas are you making from your garden, I’d love to know!


 Previous


My favorite food gift are Baked Pecans. I make pounds of them each Christmas. They are simple to make, and don’t take long. Butter, Pecans, Sugar & Vanilla. All things you have in your pantry (except maybe the pecans. some recipes add a liquor, but I don’t. Paula
My understanding of standard canning practises, is that jams do not need as long a process time as 20 minutes. At sea level, where I live, 5 minutes is recommended. I do 10, just for safety, but I think 20 is overkill.