


When it’s winter and you can’t garden, growing microgreens is a fulfilling way to grow fresh food inside when it’s impossible to do outside.
Microgreens are considered a superfood. They are gently grown seedlings trimmed and consumed at a stage when they’re nutritionally dense, at about 1-3 inches and 10-15 days old. They can be grown traditionally in soil and also without through various methods.
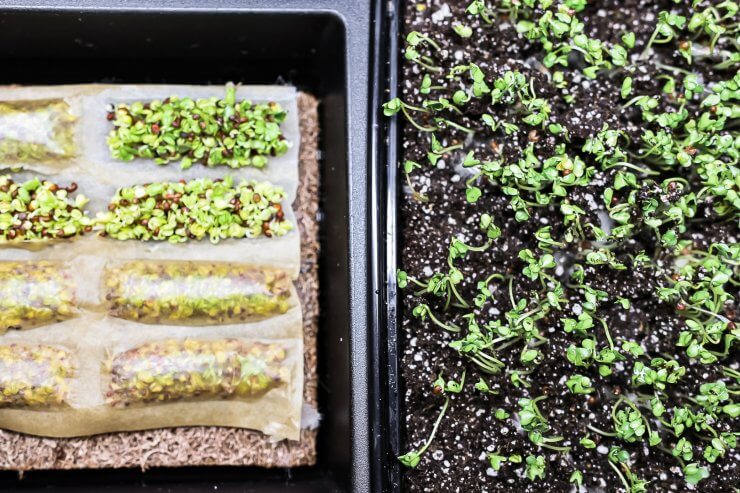
Today I’ll compare a simple soil-free microgreens kit with a traditional soil and seed method, and show you some photos from my own side-by-side experiment!
But First, Why Start Growing Microgreens?
Do you need reasons more than “it’s fun, easy, and it’s too cold to grow outside?” All right then, there are more!
A report published in the Journal of Agricultural and Food Chemistry showed that when researchers tested microgreens’ nutrient density, they were 4 to 40 times more nutrient-dense as microgreens than as fully grown vegetables. Red cabbage and Cilantro stood out as exceptionally nutritious microgreens, ranking at the top of the scale. The vital nutrients evaluated were vitamin K, vitamin C, vitamin E, lutein, and beta-carotene.
Microgreens also have intense flavors, often peppery, so when you’re garnishing a dish or sandwich, it’s not just for looks (although they are very pretty); it’s also for the taste. For example, carrot and broccoli microgreens taste very much like carrots and broccoli, but a little more peppery. Basil microgreens taste lemony, kale and pea microgreens are quite sweet, sunflower microgreens are nutty, radish microgreens are peppery, and mustard microgreens are spicy.

Growing Microgreens with a Kit
The Microgreens kit I tried was made by a company named Hamama, and the full-price cost is around $40, but they were offering a promotion at the time for their starter kit, so I got it for $17. It came with a reusable water tray and two seed quilts, consisting of a layer of coconut fiber, topped with pods of seeds.
To start growing microgreens with this kit, all you need to do is pour water into the tray up to the fill line and press down to soak the seed quilt for 10 seconds. Then you leave it in a moderately sunny spot (microgreens don’t require a lot of sun to grow) uncovered. After 3-4 days, you peel the top cover off the microgreens so they can sprout, and trim them around day 10-14 to consume. When you see two leaves at the top of each sprout, they’re ready.
I love the idea of avoiding soil for microgreens because it reduces the likeliness of introducing harmful bacteria into your microgreens which you’ll likely be eating raw.

Growing Microgreens The Old Fashioned Way
For the price of $10 plus an order of take-out, you can grow microgreens with just a little seedling soil and seeds. You don’t have to get fancy with the dirt because any fertilizers added to the pricey soils won’t get absorbed in the microgreens’ very short lifespan anyway.
Also, instead of buying the same seed packets you would for starting a garden, seek out microgreen seeds, because you’ll get a huge bag of them and you’ll need a bunch to grow microgreens.
Then, all you need are two take-out style plastic containers with lids. Use a knife or punch to make holes in the bottom of your microgreens tray, and use a lid underneath just to offer the soil a bit of aeration. Fill it with damp seedling or potting soil, about a half-inch, then sprinkle your seeds over the soil.
In a 5×5 container you’ll need about 1.5tsp of microgreen seeds, and in a 10×10 container, go for 2 tbsp. For any other size in between, scale between those two amounts. Exactness isn’t a necessity with microgreens but do try to spread them out evenly.
Then, just another light layer of seedling soil, and use a spray bottle mister to dampen the soil. Or, you can simply press the seeds into the soil and skip the second layer of soil. Cover with the lid from your second container, and put by a window. Some people will cover microgreens for the first few days to give them the illusion of growing underground, but I haven’t found that necessary because they grow so easily as-is. Keep the lid on for at least 3-4 days, only opening to mist each day.
That said, microgreens don’t make a big fuss, so they don’t need a lot of light or a grow light to grow. But, it doesn’t hurt if you have one, especially if you keep your house cool or turn the heat down to 60 at night in the winter like we do!
Good old-fashioned soil-grown microgreens seem to grow faster than their purchased counterparts, so once the majority of your microgreens start hitting the lid, it’s time to take it off so the greens don’t sit in any condensation. At this point, you simply mist them every day. They will start to turn their intended colors at this point once they start to get light in daily.

How to Trim and Consume Microgreens
When you see at least two leaves at the top of each sprout, they’re ready. They should be a couple of inches tall at this point.
Use clean scissors to trim them close to the root, and only trim the amount you plan to use because they don’t store well in the refrigerator and are best eaten fresh. Give them a rinse if you’ve grown them in soil, before consuming.
I recommend using them to top anything you can think of. They’re particularly tasty on top of soups, potato salads, sandwiches, and even avocado toast.
Once you’ve used up all your microgreens, add your soil to the compost, don’t try to re-use it to grow more microgreens, start fresh each time.

Which is Better, Growing Microgreens from a Kit or Scratch?
They’re both great methods. If you want to grow a lot of microgreens and consume them, the old-fashioned way is going to be much more economical. If you want to take a pretty “shelfie”, then the kit may be more your style. I have to say, until now I have only grown them traditionally, and I really liked that the kit removes dirt from the equation. I grow all my lettuce hydroponically for the same reason. So for that reason alone, I may be a convert!
Do you like growing your own microgreens? Please share your own tips and tricks in the comments below!


This is awesome! I will try the grow light because when it starts turning cold my plants start to die. ???? These may sound silly but once you cut them, they’re done right? Can you reuse the soil?
You should compost your soil and start fresh with each crop.
Thank you. I love her videos. So very helpful.