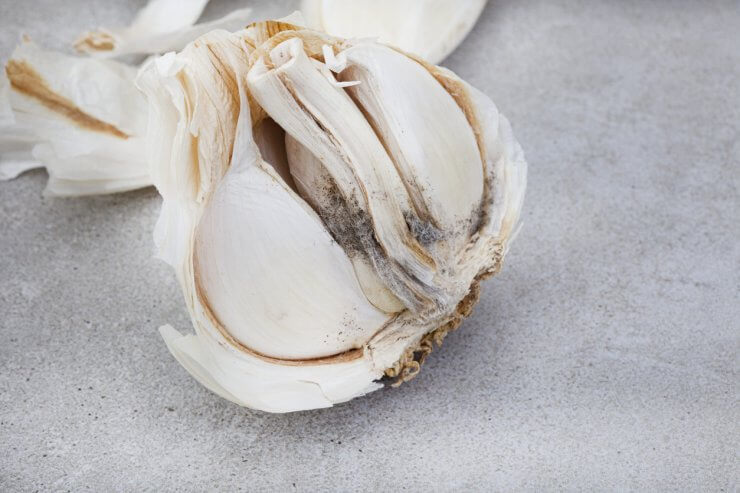
Last summer, I discovered something unusual while sorting through my stored garlic harvest. Among the perfectly preserved bulbs from my garden, I found signs of what could look like spoiled garlic to some people – one bulb had developed a striking blue-green color between its cloves. I knew this wasn’t necessarily cause for alarm – it was just the fascinating result of a chemical reaction between sulfur compounds and amino acids in the garlic. But it got me thinking about how many gardeners might unnecessarily discard perfectly good garlic, or conversely, miss important signs of spoilage that could make them sick.
After growing and storing garlic for over ten years, I’ve learned that identifying spoilage early is just as crucial as careful cultivation. The science behind garlic preservation is fascinating, and understanding it can help you avoid waste while keeping your family safe.
Understanding the Biology of Spoilage
Garlic bulbs are remarkable storage organs that have evolved to keep the plant alive through harsh winters. Each clove contains not only the genetic blueprint for a new plant but also a concentrated package of nutrients and defensive compounds. These sulfur-containing compounds, which give garlic its distinctive flavor and many of its health benefits, also serve as natural preservatives – but they can only do so much against the forces that lead to spoiled garlic.
When stored properly, homegrown garlic can last anywhere from six to eight months. However, its longevity depends heavily on both environmental conditions and the variety you’re growing. Hardneck varieties, while producing fewer but larger cloves, typically show signs of degradation after 4-6 months. Softneck varieties, including many artichoke and silverskin types, can often stay fresh for 8-10 months under optimal conditions.
The key to identifying spoilage lies in understanding the biological processes that continue even after harvest. Garlic bulbs remain alive and respiring, albeit very slowly, throughout storage. Temperature and humidity directly affect this respiration rate – too warm, and they’ll sprout; too humid, and they’ll rot; too dry, and they’ll desiccate prematurely. Each of these conditions produces distinct signs of deterioration that you can learn to recognize.
Understanding the science of spoilage has practical implications. At temperatures between 60-65°F (15-18°C), garlic bulbs maintain dormancy while their natural antimicrobial compounds remain stable. When temperatures drop below 40°F (4°C), garlic receives a signal to break dormancy – it essentially thinks winter is ending and it’s time to grow, leading to premature sprouting.
Identifying Spoilage and Making Smart Storage Decisions
One of the most common questions I get from fellow gardeners is how to tell if garlic has gone bad. The first sign of spoiled garlic is often sprouting – those little green shoots emerging from the clove tips. While sprouted garlic isn’t harmful to eat, it can be bitter, and the sprout itself should be removed. The clove’s energy is being redirected into producing that new plant, affecting both flavor and texture.
When examining stored garlic, trust your senses. Healthy cloves should be firm to the touch, not soft or spongy. Any signs of mold – typically appearing as blue, green, or black spots with a fuzzy texture – mean the bulb should be discarded. However, don’t confuse this with the blue-green coloring that can develop when garlic is exposed to acids or minerals – this is harmless and actually quite common in some varieties.
For optimal preservation, ventilation is crucial. I store my garlic in mesh bags or baskets that allow air circulation while protecting the bulbs from light. A traditional method I’ve had great success with is braiding softneck varieties and hanging them in a dry, dimly lit space. The key is maintaining constant airflow while avoiding direct sunlight, which can create warm spots that accelerate spoilage.
When garlic starts to show its age, you have options. Dehydrating sliced garlic works wonderfully – the dried slices can be stored in airtight containers for up to a year and rehydrated as needed. Fermenting garlic in honey is another fascinating preservation method that not only extends storage life but creates a delicious and probiotic-rich condiment.
One of my favorite preservation techniques involves peeling and submerging cloves in oil with herbs – but this requires careful attention to food safety. The oil must be acidified properly to prevent botulism, and the garlic-infused oil should always be refrigerated and used within a week. Warning signs of spoiled garlic in preserved preparations include any off odors, visible mold, or unusual discoloration beyond the normal blue-green hue.

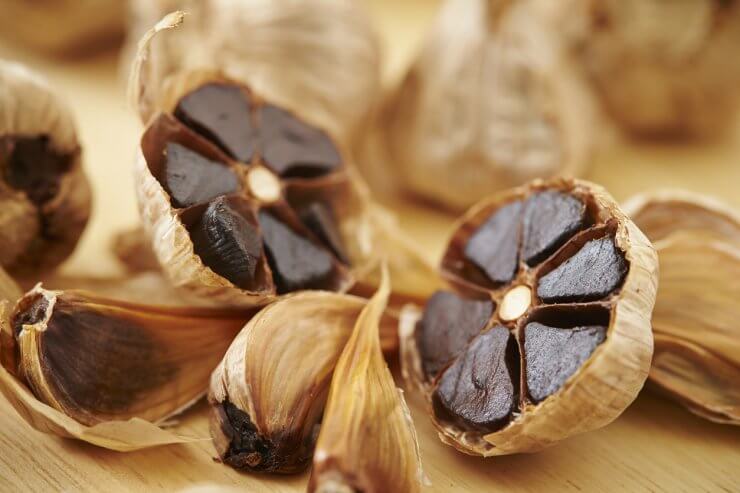
Speaking of discoloration, there’s a fascinating transformation that happens when garlic is aged under controlled conditions – the creation of black garlic. This isn’t spoiled garlic at all, but rather the result of a careful aging process where whole bulbs are kept at around 140°F (60°C) with controlled humidity for several weeks. During this time, the Maillard reaction – the same chemical process that gives bread its brown crust – transforms the cloves into jet-black, jelly-like morsels with a sweet, umami-rich flavor reminiscent of aged balsamic vinegar. The process not only creates new flavors but also increases the concentration of antioxidants and makes the garlic easier to digest. While you can make black garlic at home, it requires precise temperature control – your regular garlic storage area isn’t suitable for this process.
Have you encountered any mysterious changes in your stored garlic that made you wonder if it was still good to use? Share your experiences in the comments below! Whether you’re dealing with sprouted cloves, unusual colors, or other storage challenges, your insights could help fellow gardeners avoid waste and keep their harvest fresh longer.
Want to learn more about growing your own amazing garlic? Check out our comprehensive Garlic Gardening Guide for everything you need to know about planting, maintaining, and harvesting this essential crop. From choosing the right varieties to maximizing your yield, we’ve got you covered!


 Previous

