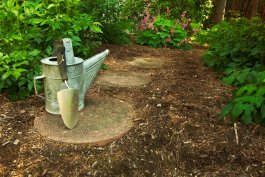
When I had the genius idea to fill in my new raised bed surrounds with crushed stone, I must have forgotten that I spend 99% of my summer in bare feet. Or maybe I thought that my bare-footedness would prepare me for walking on little daggers all summer long, but it did not. Some people like making DIY concrete stepping stones for aesthetics, but for me, it wasn’t just for the look of it, it was by necessity. I mean sure, I could dig up my flip-flops to go into the garden, but stepping stones would help too!
The first time I made these I ordered a kit online, which made me realize just how easy it is to do, and you definitely don’t need a kit. You do need some safety precautions because you don’t want to inhale cement (so wear a mask), and you don’t really want cement stuck on your skin for any long amount of time, so I suggest either rubber gloves or petroleum jelly.
Three tips before you start
- If you want to make a few stones, do them all at once. The cement doesn’t set THAT fast, so you’ll have plenty of time to design them how you want.
- Fill the molds to the top. These aren’t muffins where they will bake and grow over the top as they dry. If anything, they will flatten and shrink, so make them nice and thick so they won’t break.
- You can use anything for molds. Plastic take-out containers or disposable pie dishes even work, just be aware of what the sides look like because they don’t magically get smooth and cute, they’ll have the same ripples and curves as your container.
Making DIY Concrete Stepping Stones for a Garden
This is a simple and inexpensive way to put together your own concrete stepping stones, and I will guide you through each step of this project so it’s easy and fun!
Materials Needed:
- Face mask
- Goggles
- Quick-dry cement
- A bucket
- Rubber gloves or petroleum jelly (to keep the cement from sticking to your skin)
- Molds or any plastic containers at least 1″ thick
- Decorative stones, popsicle sticks for drawing, or whatever you’d like
- Optional: Waterproof, clear-drying sealant made for cement
Instructions:
1. While wearing a face mask, pour cement into the bucket. Add water according to bag instructions, a little at a time as you stir with a wood stirrer or trowel. You’ll want it to be very thick and not watery.
Note: If you want to make more, the rule of thumb for DIY concrete stepping stones is to use 5 parts quick-dry cement to 1 part water, however, you can follow the instructions on your bag of cement, which will tell you the exact ratio you need. In my case, 4:1 worked better.
2. Pour or scoop into molds.
3. Tap the molds down or shake a little from side to side to get any air bubbles out.
4. Put on gloves and start decorating your molds. If your cement turned out more watery than you thought, you may have to wait a little bit if you want to draw in it, or press any handprints because the cement needs to be fairly thick for it to work, otherwise the water will just draw into those spots and sit. The good news is that even if that happens you can just fix it as it dries, so no big losses there. On that note, if you are doing handprints, use petroleum jelly on your hands or gloves to prevent getting cement on your hands. When you’re done, wash your hands!
Note: When putting rocks, tumbled glass, and other objects into your stepping stones, avoid anything with sharp edges that might hurt someone walking on them barefoot.
5. Let dry for about 24 hours, peel out of molds, and voila!
Optionally, you can apply several coats of a waterproof, clear-drying sealant— one that is made for cement. This takes a bit more time because you’ll need to do a few coats and let them dry after each one, but you might get a little longer life out of them and they’ll also get a little shine to them. Again, not required and I would guess most people don’t seal their stepping stones.
Once they’re ready you can use them as stones leading to your garden, or within the garden itself like I do so I can peruse the garden whenever I like, barefoot or not!
Have you ever made stepping stones for your garden? Did you do anything differently?


 Previous


Thank you for this idea and the accompanying clear and darling video.