

In the cooler months, one of my favorite gardening activities is looking through seed catalogs and planning my spring garden. And I don’t know about you, but I know that in my experience it can be very tricky to get my hands on certain varieties of seeds that are either rare or in high demand. That’s why I don’t like to leave it to chance when I find a veggie I love, like a special heirloom tomato. Saving seeds from vegetables may seem like a lot of work, but if you enjoy it, it’s really just part of the gardening cycle. If you want to learn how to get seeds from your vegetables, I’m going to show you how!
Seed-saving can not only preserve the variety you are growing, especially if it’s an heirloom variety, but it also helps vegetables adapt to local conditions, potentially increasing yields. Like most people in my area of New England, we had a bad year for tomatoes and many crops. It was wet, wet, wet. But saving seeds from this season could potentially help next year’s crop, and at the very least, I don’t need to cut any backroom deals to get my hands on some of the most coveted seeds of the season.
You might be surprised how easy, and in some cases, how nuanced it is, to gather seeds from your existing vegetables. One thing to keep in mind is that heirloom varieties are more likely to deliver the same crop the next year. Hybrid varieties can often choose one of the parents’ traits rather than delivering the same hybrid you grew.
Tomatoes or Cucumber Seeds
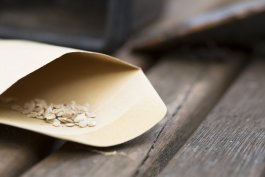
- Allow vegetables to ripen fully, then cut and scoop out the seeds.
- Put the seeds and pulp in a bucket or jar with some water.
- Stir the mixture twice a day. The pulp rots and ferments quickly, with the seeds sinking to the bottom within four to five days.
- Pour off the pulp and rinse the seeds. Spread them out to dry using a paper towel.
- When the seeds are dry and brittle and not spongey (this may take over a week), store them in an airtight container until next season.
Pepper Seeds
- Harvest seeds from peppers when they have fully ripened and started to wrinkle.
- Scoop out the seeds and spread them out to dry.
- Once they are fully dry, store the seeds in a cool, dry, airtight container.
Squash or Zucchini Seeds
- Cut open the squash or zucchini and scoop out the seeds.
- Let the seeds ferment by adding water to the seed and flesh mixture and let sit for a few days.
- Pour off the mixture to separate the seeds.
- Rinse the seeds one more time and lay them out on a paper towel to dry.
- Once done, store them in a cool, dry place.
Peas or Bean Seeds
- Allow the pods to fully ripen on the plant until they are dry and start to turn brown.
- Strip the pods from the plant and spread them out to dry on a tray indoors. The seeds should rattle inside when they’re ready.
- After shelling, leave the seeds to dry for at least two weeks or wait until planting time.
Lettuce Seeds
- Let your lettuce go to seed and flower. Make sure that most of the seed heads look ready to harvest. Then, remove the entire flower stalk and shake it over a bag to remove fully ripened seeds.
- Go through the harvested seeds while removing the fluff.
- Pour seeds onto a shallow tray and gently blow away unwanted materials.
- Once the chaff is removed, place the seeds in a clean and dry container.
Eggplant Seeds
- Before collecting seeds, wait until the eggplant is overripe. It should turn tan or brown and shriveled.
- Cut open the eggplant and separate the seeds from the flesh.
- Wash the pulp away by putting the seeds in a bowl of water.
- Strain the seeds and pat them dry.
- Spread out the dry seeds on a tray and store them in a jar. The drying time may take two to four weeks.
- After putting the seeds in a jar, watch out for moisture build-up. You can add some silica gel or other desiccants to save wet seeds.
Carrots or Onion Seeds
- Let carrots go to flower, then wait until the seed heads are fully ripened on the plant. Once the heads become dark and dry, cut and place them in a small paper bag to dry.
- Seal the container once the seed heads are dry. Then, shake it vigorously to release the seeds.
- Store seeds in a cool, dry place.
Some general advice is that dry vegetables like beans and peas should be overripe, dry, and sound like rattles in order to be ready to go. Wetter crops like tomatoes, peppers, cucumbers, and squash need to become overripe. Your tomatoes will be soft, your peppers shriveled, your cucumbers will be yellow, and your squash will be extra hard! In other words, you’ll be sacrificing a few fellas for your next crop.
After storing your seeds, don’t forget to label them correctly. Include the name, variety, and date of collection. This allows you to determine how successful your seed-saving project is.
Which seeds do you save, and do you have any special techniques or tricks to share?


Thank you. I’m in zone 10a Florida Gulf coast & when I cut into my ripe eggplant, seeds are plentiful. Same with tomatoes. I just throw these (wet seeds) in my garden & within 2 weeks I have eggplants & tomatoes sprouting everywhere! Some I place on a paper towel & wait about a week+, then save for the following year!!!
This is great and useful info…Thanks so much! I never separate my seed from the connective tissue One year I sliced overripe tomatoes planted the slices and had a great crop…however…late and short fruiting season.I will do this as you suggest and record my harvest for FUTURE ref. Thanks again!
Nice article! Curious about pepper or veggies in general that have gotten from the market and have been refrigerated. Can you still effectively attain the seeds from them and in the same way( ie like needing to overripen a pepper to get the seeds)
When you can save some seeds, you want to replant how many seasons will they last?
When you have saved your tomato seeds, how many seasons can you keep them?
That was so interesting thank you