
If you’re reading this, chances are you’ve already dabbled in the art of growing your own pumpkins. And with the spooky season right around the corner, it’s high time we talk about turning those pumpkins into masterpieces. So, grab a cup of hot apple cider, cozy up, and let’s dive right into the world of pumpkin carving—starting with history, then moving on to the best pumpkins to grow for carving, and finally right into the details of how to carve!
The history of pumpkin carving
Ah, the enchanting glow of carved pumpkins, or jack-o’-lanterns, on a crisp autumn evening! Ever wonder where this magical tradition originated?
The Tale of Stingy Jack: The story starts in Ireland with a folk tale about a mischievous fellow named Stingy Jack. Legend has it that Jack managed to trick the devil, not once but twice! However, his cunning also led to his downfall. When Jack died, he was denied entry into both Heaven (because of his deceitful ways) and Hell (thanks to his bargain with the devil). Instead, the devil gave Jack a single ember to light his way through the darkness. Jack placed the ember in a carved-out turnip, creating the first-ever jack-o’-lantern.
Turnips to Pumpkins: While the Irish and Scottish originally used turnips, potatoes, and even beets for their carvings, things changed when they immigrated to America. They discovered the pumpkin, a fruit native to the continent, and realized it was not only larger but also easier to carve! Thus, the pumpkin became the face of the jack-o’-lantern we know and love today.
The Symbolism: Carved pumpkins originally acted as protective symbols. The illuminated faces were placed outside homes to ward off evil spirits, particularly on Samhain, a Gaelic festival marking the end of the harvest season and the onset of winter.
Modern Day Evolution: Today, carving pumpkins has become a cherished activity worldwide. The tradition has evolved beyond its spiritual origins to become a beloved part of Halloween celebrations, with families gathering to create everything from spooky faces to intricate designs.
In a way, the glowing faces of jack-o’-lanterns bridge the gap between ancient folklore and modern festivities, illuminating our doorsteps and warming our hearts. So the next time you carve a pumpkin, remember Stingy Jack and the rich tapestry of history that your jack-o’-lantern represents!
The best pumpkin varietals for carving
Now, not all pumpkins are created equal, especially when it comes to carving. Those pumpkins with a softer, lighter orange hue? They’re a breeze to carve, making them a favorite for many of us. On the flip side, the deeper orange pumpkins come with a sturdier skin, which means they hang around looking fresh for longer. It’s all about what you’re looking for! Here are the stars of the carving world.
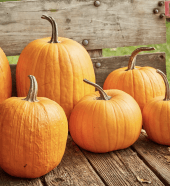
Connecticut Field pumpkin.
Image courtesy of Burpee.
Connecticut Field: This lovely gem flaunts a generous diameter, ranging from 12 to 20 inches, and sits gracefully with its flat base. It’s as if it was destined to wear those iconic jack-o’-lantern smiles and winks! And guess what? After the Halloween festivities, this pumpkin effortlessly transitions into the kitchen, lending its delicious flavors to your favorite pies.
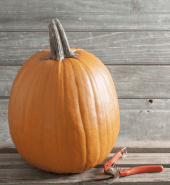
Howden pumpkin.
Image courtesy of Johnny’s Selected Seeds.
Howden: In the world of pumpkin carving, there’s one name that frequently stands out—the Howden pumpkin. A proud descendant of the Connecticut Field lineage, this pumpkin variety owes its inception to John Howden of Massachusetts. Introduced in the vibrant 1970s, the Howden quickly became synonymous with the quintessential, large Halloween pumpkin look. What makes it a carver’s delight? Its generously thick walls that beckon intricate designs and patterns. And for those worried about the dreaded black rot, breathe easy! The Howden boasts a commendable resistance against it. Truly, it’s a pumpkin that merges beauty with resilience.
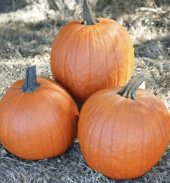
Gladiator pumpkin.
Image courtesy of Osborne Quality Seeds.
Gladiator: A true champion in the pumpkin world! Weighing in at a robust 20 to 25 pounds, it’s a perfect size. When placed side by side with its peers in field tests, the Gladiator emerges as a true warrior against the pesky powdery mildew. Dazzling in a deep orange hue, this pumpkin sports a round physique with gentle ribbing, spanning about 13 inches across and standing tall at 12 inches. And those handles? They’re like the sturdy arms of a gladiator, thick and deeply anchored to its hefty body. This pumpkin thrives on vigorous semi-vine plants that generously offer a bounty of consistently shaped and sized pumpkins.

Jack O Lantern pumpkin. Image courtesy of Burpee.
Jack O Lantern: An age-old heirloom variety with a name that says it all. If you’re on the hunt for the perfect carving companion, this pumpkin is your go-to! But wait, there’s more: it’s not just a pretty face for Halloween; it’s a culinary superstar too in pumpkin breads, soups, and pies—you name it! Physically, these pumpkins are just right: medium-sized, with a round to slightly elongated silhouette.
- The name says it all, it’s a perfect carver, medium sized, slightly taller than fat, and tastes good in recipes too!
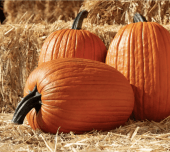
Harvest Jack/Hulk pumpkin.
Image courtesy of Seedway.
Harvest Jack/Hulk: A superstar in the world of carving pumpkins! Picture this: a pumpkin with an elongated, almost vertical oval shape, bathed in a captivating deep orange glow. Those robust walls? They’re every carver’s wish come true, standing firm and ready to be transformed into any design your heart desires. And here’s the kicker—its dark orange skin is complemented with handles stretching a generous 4 inches, making it a breeze to carry and showcase. Plus, if you’re planting a patch of these gems, you’re in for a treat. The Harvest Jack F1 (also known as the Hulk) promises an impressive yield, flourishing in a variety of growing conditions. All in all, it’s a pumpkin that promises both beauty and bounty!
- A tall oval pumpkin with a deep orange glow with extra thick walls, and tall sturdy stalks which make them easy to carry.
- They also are easy to grow and will produce a ton of pumpkins, so it’s a pumpkin that promises both beauty and bounty!
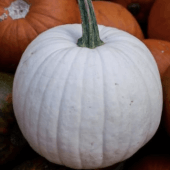
Casper pumpkin.
Image courtesy of Pinetree Garden Seeds.
If you’re up for a non-traditional white pumpkin, Casper is a great carver! Designed more for its enchanting looks and carving prowess than its taste, the Casper pumpkin is a spectacle in pale, almost otherworldly white. Weighing in at a substantial 12 to 15 pounds, these alabaster beauties are perfect for adding that unexpected twist to your stoop.
Pumpkin carving tools
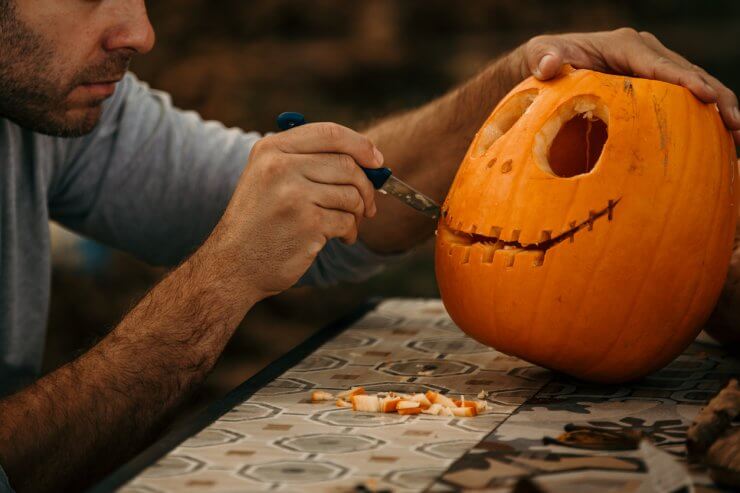
Just as a painter needs a range of brushes, a pumpkin artist requires a set of specialized tools. Each knife brings its own magic to the pumpkin-carving table, helping you transform that humble gourd into a glowing masterpiece!
- Basic craft knife: This is the all-rounder, the trusty friend in your toolkit. It’s great for simple designs and straightforward cuts. Think of it as the comfy sweater you always reach for–familiar and versatile.
- Serrated pumpkin saw: Picture the little serrated knives that often come in store-bought pumpkin carving kits. These are your go-to for cutting off the pumpkin’s crown and making the larger cuts. The serrated edge helps to saw through the thick pumpkin flesh smoothly.
- Paring knife: A kitchen favorite! The paring knife, with its small and sharp blade, is perfect for refining edges and carving out smaller, more intricate details.
- V-shaped carving knife: Now, here’s a specialist! With its unique v-shape, this knife helps you etch fine lines and subtle details into your pumpkin, ideal for those wanting to take their designs up a notch.
- Loop tools: Usually found with clay sculptors, these tools can be a game-changer for pumpkin artists too! They’re ideal for shaving off thin layers of pumpkin skin and achieving that magical, glowing effect when a candle is placed inside.
- Poke tool: Not exactly a knife, but a worthy mention! This simple tool can be used to outline your design by poking small holes, acting as a guide when you start to carve.
- Drill bits: Feeling adventurous? Using various sizes of drill bits, you can create intricate patterns, or even a starry night scene, with little round holes.
No matter which tools you choose, safety is paramount. Always carve with care, keeping your fingers away from the blade’s path.
Carving techniques to try
Look for a pumpkin with a flat base to ensure it stands steadily. Also, give it a gentle knock; a hollow sound often indicates a pumpkin that’s easier to scoop and carve.
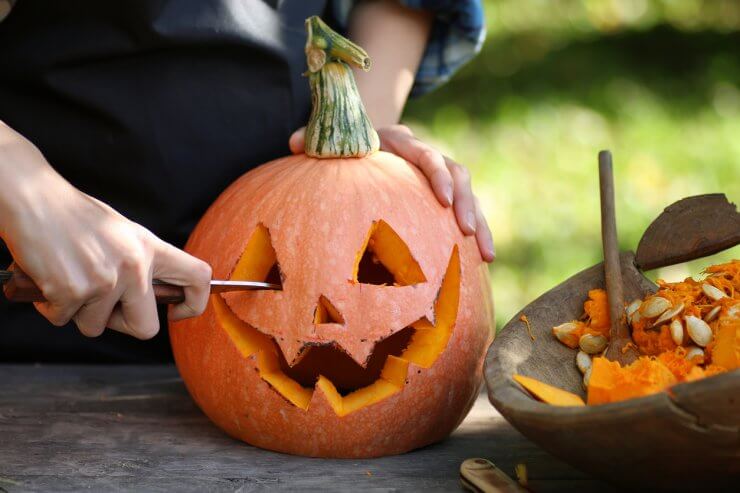
- Classic jack-o’-lantern: This is where it all began. A simple, happy, scary, or goofy face. Use a sharp knife, and remember to cut out the top at a 45-degree angle so the lid doesn’t fall in.
- Stencil magic: Want to carve a witch, cat, or haunted house? Grab a stencil online or at your local craft store. Tape it to your pumpkin and use a poking tool to outline your design before you start carving.
- Etching: Instead of carving all the way through, you scrape away the pumpkin’s skin to create a design. It gives a beautiful, glowing effect when lit!
Carving tips:
- Cut from the bottom: Instead of cutting a lid from the top, try cutting out the bottom of the pumpkin. This makes it easier to place over a candle or light source, and your pumpkin won’t have that telltale lid ring.
- Cut at an angle from the top: If you cut from the top, cut at an angle so the top doesn’t fall in.
- Ice cream scoop magic: Use an ice cream scoop to clear out the seeds and pulp. Its sharp edge and sturdy handle make for efficient and tidy scooping.
- Carve with cookie cutters: Want a fun and uniform design? Press a cookie cutter into the pumpkin and gently hammer it through to create perfectly shaped designs.
- Layered carving: Instead of carving all the way through the pumpkin, scrape away layers for a beautiful, glowing effect. This technique is especially effective for creating detailed facial features or scenes.
- Toothpick repairs: Oops! Accidentally cut off a piece you didn’t mean to? No worries. Use toothpicks to reattach or support fragile carved areas.
- Sprinkle some cinnamon: If you do use a candle, sprinkle some cinnamon or nutmeg on the inside lid. As the pumpkin heats up, it’ll release a lovely autumnal scent.
Keeping that pumpkin fresh
After spending all that time carving, you’d want your masterpiece to last, right? Here are some tips:
- Pick a fresh pumpkin: Start strong! Choose a fresh pumpkin that’s firm to the touch. A fresh pumpkin can better resist mold and dehydration.
- Keep it cool: Like many of us, pumpkins prefer cooler temperatures. If possible, store your carved pumpkin in the fridge overnight or place it outside if the nights are chilly.
- Apply a preservative: Spraying the cut surfaces with a mixture of bleach and water (1 teaspoon bleach to 1 gallon water) can deter mold growth. Just make sure to let it air dry after the bath. This is best for indoor pumpkins, otherwise wildlife might eat it and get poisoned!
- Petroleum jelly: Smear the cut edges with a thin layer of petroleum jelly. It prevents them from drying out.
- Rehydrate: Carve too early? If your pumpkin starts to shrivel, give it an ice bath for an hour to freshen it up.
- Avoid direct sunlight: Much like vampires, carved pumpkins prefer the shadows. Keep your pumpkin out of direct sunlight during the day to prevent it from drying out.
- Opt for LED lights: If you’re lighting up your pumpkin, consider using LED tea lights instead of real candles. They produce less heat, reducing the risk of the pumpkin cooking from the inside.
- Natural oils: Some folks swear by spraying the pumpkin with vegetable oil or white vinegar to fend off pesky fungi.
- Store upright: Keeping your pumpkin upright ensures that air circulates around it, which can help delay the rotting process.
- Watch out for critters: If you notice squirrels or other little munchers showing interest in your creation, a light dusting of cayenne pepper around the pumpkin can deter them.
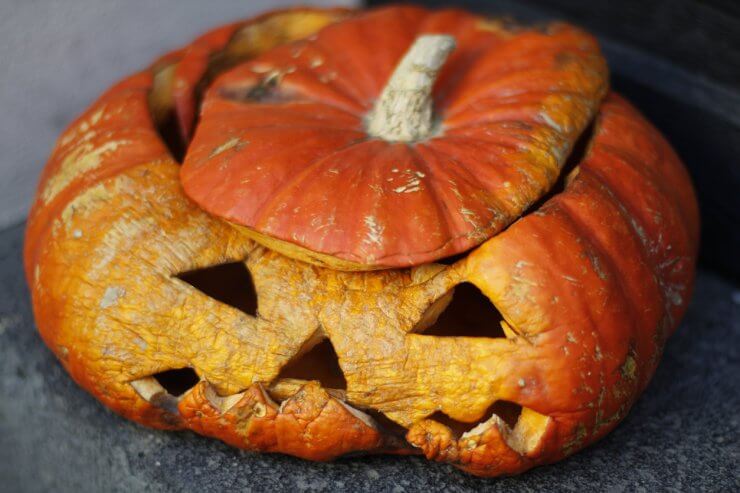
After the season
Once your jack-o’-lantern has shone its last light, don’t just toss it! Here are a couple of sustainable ideas:
- Pig snack: If you know someone who has pigs, they’ll love your old pumpkins. Pigs enjoy them as a tasty treat—but not if you preserve them with bleach or petroleum jelly!
- Save those seeds: Remember, each pumpkin is a treasure trove of seeds. Save, clean, and dry them for planting next year, or roast them with a sprinkle of salt for a delicious snack.
- Compost it: This is the pumpkin’s circle of life moment! Toss it into your compost bin to decompose, and in time, it’ll nourish your garden.
- Pumpkin bird feeder: Transform your pumpkin into a feast for our feathered friends. Fill it with birdseed and watch as the local birds gather for a seasonal snack.
- Planters: Think of your pumpkin as nature’s pot. Fill it with soil and some autumn-friendly plants or flowers. As the pumpkin decomposes, it acts as a natural fertilizer.
- Return to nature: If you have the space, and if you opted out of some of the preservation options above that might hurt wildlife, simply place your old pumpkin in a secluded spot in your garden. It’ll break down naturally, providing nourishment for the soil and a snack for critters.
Growing your own pumpkins and then carving them is one of the most satisfying experiences. From selecting the right varietal to preserving and finding post-Halloween uses, every step is a rewarding journey. So, here’s to the home growers, the carvers, and the pumpkin enthusiasts—may your spooky season be filled with creativity and fun!
What do you think are the best pumpkins to grow for carving?


 Previous

