There are many great reasons to grow your own lettuce, and I personally prefer to grow it hydroponically indoors from fall through spring. One of the most compelling reasons for me is that there are so many recalls on processed lettuce in the stores. That alone is enough to make most people want to grow your their lettuce but there are other benefits too.
But how to begin? Many commercial growers of lettuce have great setups, like cold frames, that keep their lettuce safe from bird poo and pests, although they’re often just grown out in the sunshine like the rest of the plants.
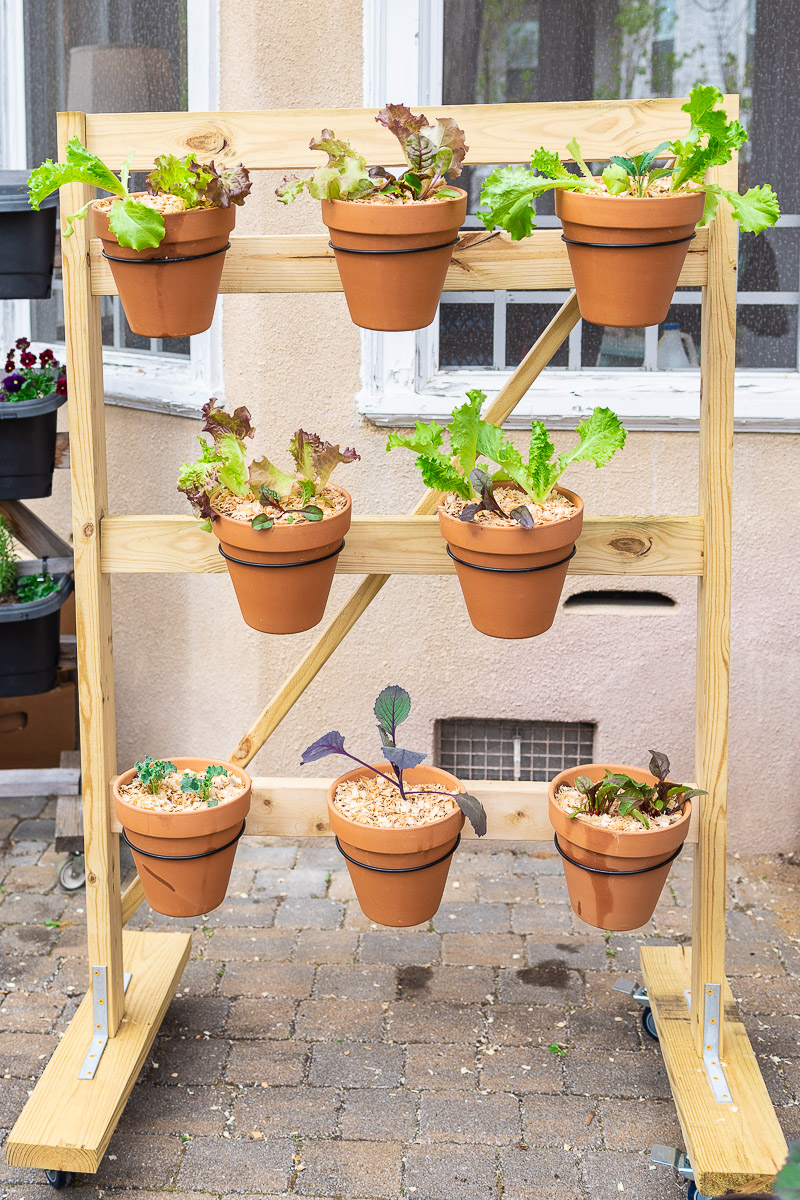
In the summer, one way I like to grow lettuce is in my dedicated raised lettuce garden, which is a vertical growing setup. I have grown lettuce in my regular raised beds, for sure, but they almost always ended up getting chewed up by rabbits or other pests and so I would often let them flower and become ornamental. So now I like to grow them in a raised lettuce garden I built that allows me to move the lettuce out of the sun on ultra-hot days, and is also great visually if I do still let them go to seed and flower. Everyone always asks me how to build one themselves, so I thought it was about time to share with you how I built it!
In this video, I’ll tell you all about the first version I built a couple years ago, and then built it again with some tweaks and step-by-step instructions.
What you’ll need to build this raised lettuce garden:
Note: All the lumber shown is pressure treated because it’s not touching any plants. It will hold up to weather and won’t mind being outside. To make your raised lettuce garden last even longer, store it indoors or in a shed for the winter.
Wood:
- 2 2×6’s that are 2 1/2′ long – these will be the bottoms of each base
- 2 2×4’s that are 5′ tall – these will be vertical pieces
- 4 2×4’s that are 38” long – these will become the top bar and also three cross bars which will become the mounting boards for our planter ring hangers
- 1 66 3/4″ 1×1 or even a 2×4 that you’ll use as a cross brace in the back
Accessories and tools:
- 8 – 8 1/4” flower pots
- 8 – planter ring hangers ( 7.5” width)
- 4 – 3” swivel casters with breaks (meant for outdoor / concrete) Try to not cheap out on the casters – quality ones will make moving your lettuce garden a breeze for years to come.
- 16 – 3/4″ stainless steel screws or the ones that fit the mounting holes of your casters
- 40 – 1-1/4” exterior screws for the ring hangers (16) and L brackets (24)
- 18 – 3-1/2” exterior screws for the cross brace (2) and cross bars (16)
- 4 – 4” rust resistant or stainless steel L brackets
You’ll also need a trusty impact driver or drill to get the job done.

Step 1: Set up your legs.
Set out your 2×6 base pieces, which will be your feet. The center point for your 2×6 base pieces is 15″. Set your 5′ vertical piece in the center of that. There should be 2” remaining on each side.
Drill in L brackets to secure the vertical board on each side of your 5′ board with 1 1/4” screws. Now repeat these same steps for the other vertical bracket. Repeat this whole process again with your second set, so you end up with the two feet and legs of the raised lettuce garden.
Step 2: Attach the cross-boards.
Grab a friend or use an elevated work surface to attach the 4 38″ 2×4’s. You’ll be using 4 3-1/2” exterior screws for each cross board. Start by attaching the top cross board. This piece won’t have any planter rings attached to it but it adds stability and can be decorated to your taste.
Next, add the lowest cross bar. This will be the lowest level that you’ll have plants hanging from. Don’t forget, depending on the diameter of the casters you buy. You may be adding 3-5 inches in height. So if it seems low, don’t worry, they’ll be getting a boost from your casters. Once you pick a height you like, you can attach one side by drilling two screws into each end. Once you screw one side in, measure to make sure the cross bar is the same height from the bottom on next side before attaching it with the other two 3-1/2” exterior screws. My bottom bar was 17 inches from the bottom of the base.
Next you’ll add the first top cross bar for our plant hangers. Mine was 4inches below the bottom of the top cross bar. Fasten with 4 3-1/2” exterior screws, two on each side.
For the middle cross bar. I found half the distance between the other two hanging planter cross bars measuring the distance between the bottom of the upper hanger planter cross bar and the top of lower hanging top bar. The halfway point for me was 14 1/4 inches.
Step 3: Fasten planter ring frames
It’s time to fasten our planter ring frames. For the upper and lower cross bars I measured 5 1/2″ from each side. The middle one was lined up in the middle of the two hangers. For me that meant 16 inches from inside of the plant hanger. Repeat this process for the bottom cross brace.
For the middle cross brace I measured 10 1/2 inches from the vertical frame on each side to find the placement of the two plant ring hangers. Each plant hanger is attached with two 1 1/4” exterior screws.
Step 4: Add casters
I centered and measured 2 1/2″ in from each corner for the placement of each caster. Use the 3/4″ stainless steel screws to attach the casters.
Step 5: Add bracer
If you aren’t on the level surface move plant hanger over to one like I did. The bracer adds stability and keeps the planter from twisting when you’re rolling it around. Measure the distance diagonally between the two vertical 5′ pieces. For me this measured 66-3/4″ inches. I used two 3-1/2″ screws to fasten the bracer to the two vertical pieces.
Step 6: Assemble and fill the pots
Now you can add your pots to the planter rings (or otherwise affix whatever planters you bought). I fill my pots with general vegetable potting soil, and then I added pine mulch on top to avoid splash-back when it rains and to keep the plants moist a little longer. Since I’m using terracotta in this version, they’ll dry out quickly which isn’t terrible for lettuces but you do need to keep an eye on them. Luckily, lettuce is very good at showing you when it needs water.
What else do I need to know about building a raised lettuce garden?
You can customize your planter hanger with hooks on the side for tools, decorations on the top cross brace, or even paint it your favorite color.
If you do decide to paint the planter, I recommend painting the wood before you put it all together, or at the very least, before step 3 when you start adding the planter ring frames.
Do you have any questions for me? Can I help make any instruction more clear? Let me know!


 Previous


How much does the whole rack cost?
It’s nice to see that my little girl got some of her dads “build it better” knack!
Will this also work for other “hanging” plants like strawberries?
Absolutely – this would be a great way to plant strawberries
where purchase pot ring hangers?
I got them at Lowes, but most garden supply stores should have them too.