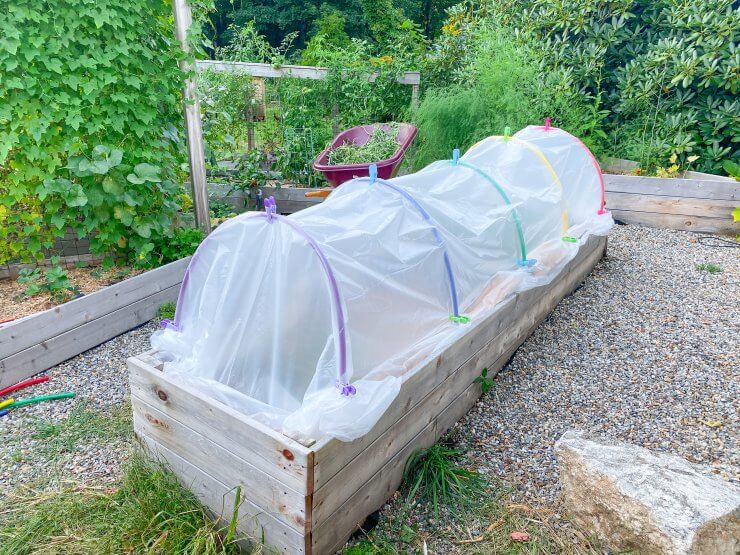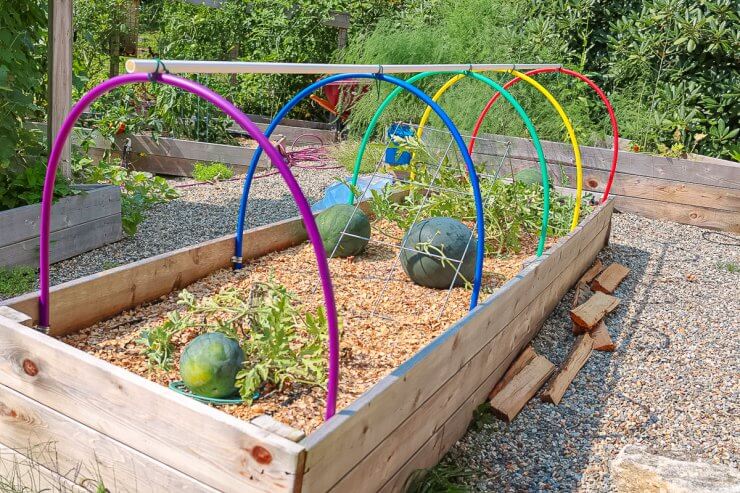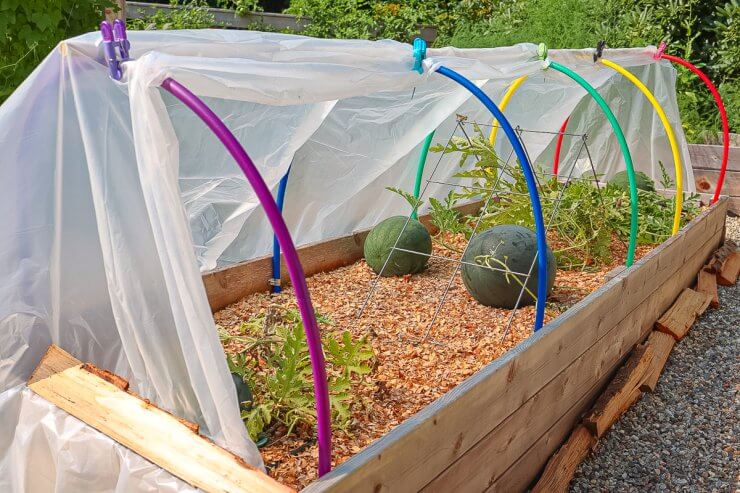
Keeping your garden warm in late fall or early spring can be accomplished in a number of ways. One of the more permanent solutions is to build a cold frame. A cold frame attaches to your raised bed and can be propped up to offer a greenhouse effect during the day, and closed to keep seedlings or plants warm during the night when temperatures are colder. Building a cold frame is tricky and requires some woodworking skills, but it’s not the only (or easiest!) way to create a warm bed for our crops. And I thought you deserved a project that was easy during harvest season! And so, I embarked on this DIY hoop house project that I’m confident you and everyone you know could complete, and it only takes about an hour.
Plus, cold frames are either permanent or require significant storage space in the summer. With a hoop house, you can leave the hoops up all summer and cover them with mesh nets instead if you want. If you want to remove them, you can, and they take up barely any room at all. I plan to keep mine up and use them as a trellis or as supports next year.
To make a DIY hoop house project easy to accomplish, there has to be wiggle room in all areas of design. I’ve come up with a very simple solution, and then a few ways you can upgrade your hoop house to be even more sturdy. Sure, there are hoop house kits you can buy online that range from $40 to $200, but you’re sort of stuck with what you get, whereas this project allows you to customize to the width and length you need. Plus, you can create a rainbow garden like mine if you use hula hoops!

For this project, we’re using hula hoops. Before you start, do me a favor and measure the length of your bed. This is going to help determine how many hula hoops you need to buy.
Earlier this year, I ordered this pack of twelve 36-inch rainbow hula hoops for my daughter’s class picnic, which I ended up using for this project. She’s an only child and doesn’t need 12 giant hula hoops. They were a bit pricy online, but you can find hula hoops at the dollar store and other local stores a bit cheaper, though I’d recommend the 36-inch hoops for this project.
My bed is 10 feet long, but you can use a bed that’s longer or shorter, that’s the beauty of this custom DIY hoop house. Giving the bed some room on both ends, I used five hoops with about a foot and a half between them, which I mostly desired because they are a perfect space for the logs of wood I’m using to hold down the greenhouse plastic when it’s closed up. I would suggest using a space no larger than a foot and a half, or the tarp will start to droop.
You’ll need:
- 36-inch hula hoops (1 for every 1 1/2(ish) foot of bed length)
- 1/2-inch galvanized tube straps (2 per hoop, or for extra stability use 4 per hoop)
- 2 screws per tube strap (shorter than the depth of your wood so it doesn’t come out the other side)
- 3-mil 10-foot x 25-foot plastic sheeting (or mesh netting)
- Chip clips or clamps (3 per hoop)
- Wood or stones to hold down the plastic
- Tools: Power screwdriver, pruning loppers (or a handsaw/hacksaw)
To make the DIY hoop house:
- Measure the length of your bed. Mine was 10 feet long.
- Look for the staples in your hoop where it comes together, and plan to trim that off. Using a saw or, like myself, some pruning loppers, make a cut and then use your judgment to decide how big to make the hoop for your needs, then make your second cut. My hoops were cut a little less than half for a 2-foot bed.
- Clear your bed of anything growing along the outside edges. I’m using my hoop house to give my melons a longer growing season, so I trimmed all the vines growing off the side, and even pruned off any small watermelons that I knew wouldn’t make it so that the rest of the plant’s energy goes to the bigger watermelons.
- Starting out about 4 to 6 inches from the end of your bed, screw in your first galvanized tube strap, about halfway between the top of the box and your soil line. This will give you the most stability for the curved hoops.
- Repeat this step again at the end of the box.
- Measure the distance between the two tube straps to determine where the hoops will be placed. I placed mine 18 inches apart for the best stability. The further you space apart, the higher likeliness you’ll need to add stabilizing bars.
- Now, just screw in your tube straps, repeat on the other side, and add your hoops!
- Next, roll out your plastic sheeting, or mesh netting, over the hoops, all the way to the end. Trim in the way that makes sense to you. You can weigh down the plastic with wood or stones on the ground, or you can roll them up in the tarp and weigh them down inside of the bed, which is what I did. Either way, I would leave the tarp long enough to touch the ground, if not longer, on all sides. You can always trim later, but you can’t add more!
- Finally, add your clips or clamps on the sides and top of each hoop to secure the plastic.
- Now you’re done! Look what you did!
You could leave this DIY hoop house alone exactly as-is at this point; opening it during the day, and closing it at night. You can use the clamps to hold the sheeting up as needed. But there are certainly more ways to upgrade this design if you want to.

For example:
To keep hoops from leaning: I don’t find they lean much at all, but if yours do and you want to do something about it, add a PVC pipe the length of your bed down the middle and secure with zip ties for a temporary solution (see above), or screws for a more permanent solution. This will make sure that the hoops stay the same space apart and don’t lean. Another way is to use four galvanized tube straps per hoop (one close to the soil and one at the top), but the curved nature of the hoops can make this tricky.
To use fewer hoops: Do the same as above for the sides of the hoop house, which will help the sides of the plastic from sinking in. It will also help create more structure for any leaning hoops, but you’ll need to screw these ones in because the zip ties won’t hold them up. I’d do this only if you’re planning to keep it as a permanent structure.
To create a DIY hoop house without a raised bed: Get yourself some rebar for each end of the hoops, hammer them into the ground, and then you can slide the hoops over them.
For easier window opening: Instead of using wood or rocks to hold down the tarp, use a PVC pipe the length of the bed, and wrap it up with the tarp like a roll. Then add some clamps to create an easy-to-open shade for the daytime (see video).

Do you have any bonus tips for other subscribers about building a simple DIY hoop house? Leave a comment below and share the love!


 Previous


I did all that you did and used PVC making it permanent a few years back . then I used frost blanket to use the garden longer (I live in Oklahoma). The PBC cut the frost blanket and eventually ripped to pieces from the wind, destroying it entirely.
I used PVC pipes instead of hula hoops. They bend easily. I also inserted them into rebaI and screwed the metal clamps (tube straps) to hold them in place. I’ve had them in place without issue for nearly 5 years. My main goal is to keep birds from eating the seeds and plants.
I am so sad when I look out at our garden and you have given me new hope! We are new to middle TN and still trying to figure out what to plant if at all. Thank you!
Perfect timing, I was just thinking about how to extend my fall crop through the winter. I live in zone 8 so I have over wintered things before. But we do get cold snaps, as well as I need to keep my feral cats out of my garden. So thanks for the idea.