

Throughout the year, as different fruits come into season, I make a fair share of jams—strawberry, peach, blueberry, blackberry, and so on. There are several reasons I enjoy doing this, but one of the things I really love is giving these jams and preserves as gifts. Recently, to fancy them up a bit, I decided to decorate the jam jars before I gave them out.
Jams and preserves make great gifts. They’re shelf-stable as long as you keep them in a cool, dark spot. They’re delicious. And everyone loves a little jar of homemade something or other. Plus, when you need a last-minute gift, you can just head to your pantry or root cellar and bingo! You have a gift.
I’ll be the first to say that I love getting a jar of homemade goodies. And as far as I’m concerned, it can be a plain jar with a lid. I’ll also be the first to say that when I give someone a similar gift, I prefer to decorate jam jars and make it a little extra special if I have the time.
The nice thing is that you can keep it simple or go all out. It’s really up to you. So here are some of my favorite ideas to hopefully get you started thinking about how you might like to decorate jam jars.


Discover 7 top tips for growing, harvesting, and enjoying tomatoes from your home garden—when you access the FREE guide The Best Way to Grow Tomatoes, right now!

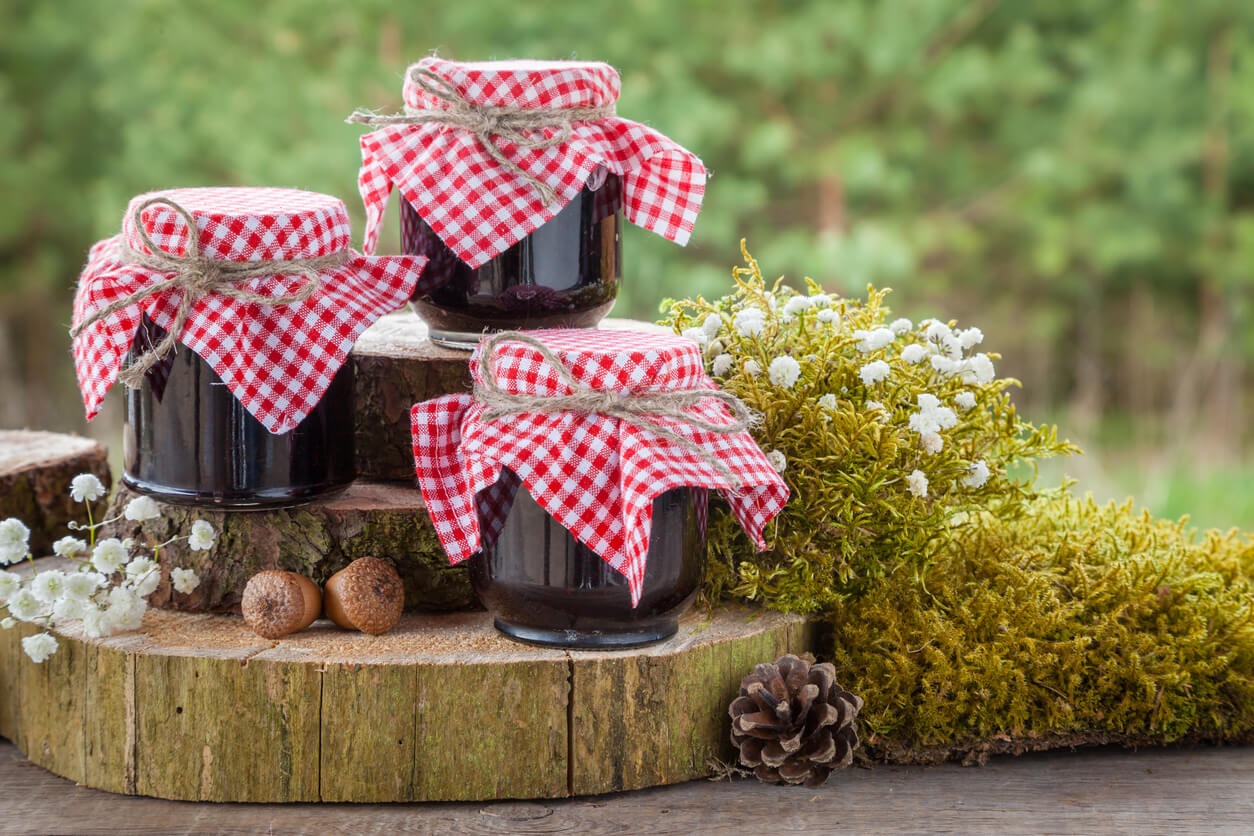
3 ways to decorate jam jars for the perfect gift giving
The first two ideas are classic and low-key, and they also look great. There’s a lot of beauty in simplicity!
1. Twine and a tag. You don’t need much for this one. Just a roll of twine, a small tag or label to write on, and some scissors for cutting the twine. Simply cut a section of twine long enough to wrap around the threads of the jar (making sure not to wrap it underneath the lid-we don’t want that popping off). Grab a tag and write a description of the item, such as “Strawberry Jam.” Then all you need to do is thread the tag through the twine and tie it.
I prefer simple twine, like this, but you can find it in just about any color imaginable.
As for tags, I like these plain tags, as I can use them any time of year, but I can’t deny that these are awfully cute for Christmas.
2. Gingham cloth covers. Here, we’ll take the twine and tag idea one step further. In fact, the only difference is that you’re going to add a piece of gingham fabric over the lid, then follow the same directions above. You can buy pre-cut fabric, but it’s not hard to make your own, and it’s much less expensive.
Just grab a small round item to use as a sizing guide. I find a coffee can or small soup bowl works well. You want something large enough to cover the mouth of the jar and have enough room left to hang down a little all the way around. Lay the fabric on a flat surface and place your template on top of the fabric. Using a pencil, outline the template.
Pro tip: Cut out the first fabric cover and make sure it’s the right size before you make more. Better to correct mistakes early on than to end up with a lot of unusable fabric.
Once you’re sure the size is correct, continue until you make as many covers as you want. Then to decorate jam jars with the fabric, center the cloth on the jar and proceed as above, placing the twine over the fabric to hold it in place.
I like the classic red and white cloth, but again, you can use any fabric you like.
There are some variations on these ideas that are also easy. For instance, you can tie a small decoration alongside the tag to celebrate the appropriate holiday.
Those are simple, quick, and classic. However, if you have more time or you’re feeling especially motivated, you can step things up.
3. Decoupage. You have nearly endless ways to decorate jam jars if you go the decoupage route. If you aren’t familiar, decoupage is pretty straightforward. It’s basically gluing on paper or fabric decorations and sealing them so they last. Mod Podge is the classic all-in-one sealer, glue, and finish.
To decorate, randomly cut or tear small pieces of colorful paper, fun fabric, pages of a favorite book, wrapping paper, sheet music, an old map, a recipe, or pretty much anything else that strikes your fancy. Brush a small amount of your Mod Podge on the jar, then place your fabric or paper over it and smooth it out with your fingers. Continue until you’re finished, then apply a thin coat of Mod Podge over your decorations to finish and seal it. Then just add your twine and tag so your gift recipient knows what’s in the jar. Easy peasy!
How do you decorate jam jars? I’d love to read your ideas in the comments.
[affiliate_note]
Discover 7 top tips for growing, harvesting, and enjoying tomatoes from your home garden—when you access the FREE guide The Best Way to Grow Tomatoes, right now!