

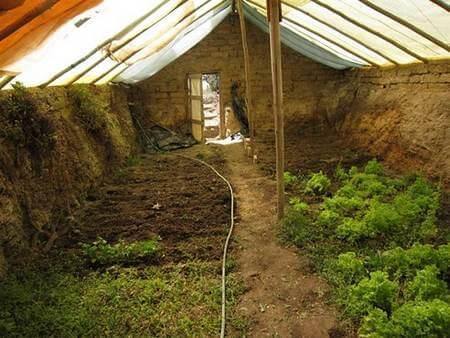
Subterranean greenhouse, underground greenhouse, deep winter greenhouse, or Walipini. If you want to grow vegetables throughout the year, this might be your go-to.
“Walipini” means, “place of warmth” and comes from the indigenous Aymara people in the Altiplano regions of Peru and Bolivia. This in-ground greenhouse allows farmers to grow despite harsh climate conditions and high winds that would be difficult for a traditional greenhouse to withstand.
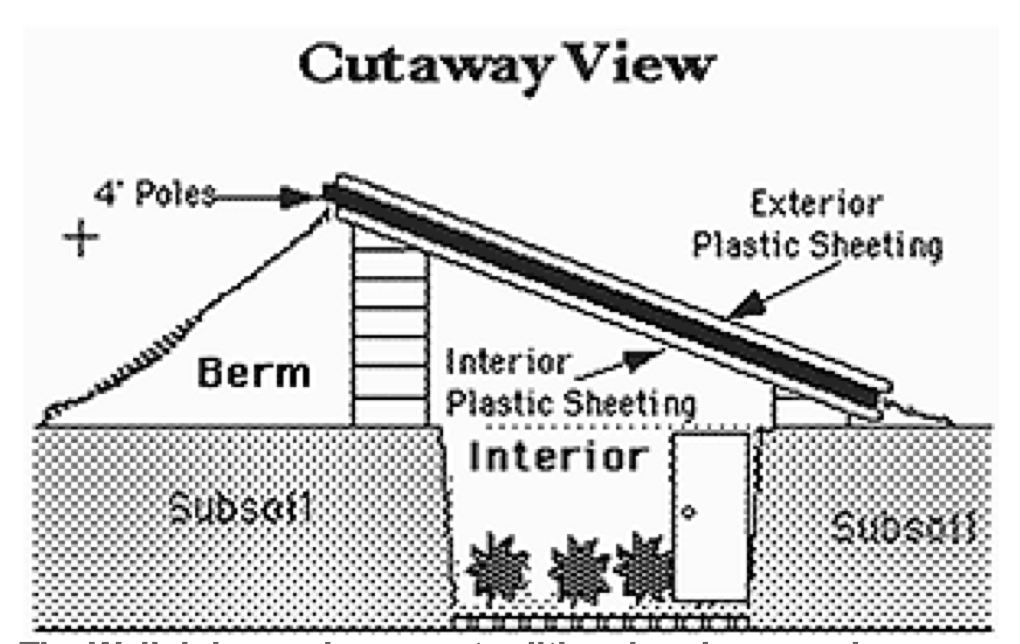
The concept takes advantage of the fact that the earth will absorb heat and slowly release it, as well as insulate the area within the greenhouse. A greenhouse like this may be fully subterranean, with just a glass ceiling above the ground, or there may be a few feet of the building above ground, or you could build it into a hillside. The goal in any case is to keep most of the structure underground with only a glass ceiling or facade to let sunlight and warmth in.

Building your subterranean greenhouse
Begin by determining the location of your greenhouse.
You need an open, sunlit area where you can dig 6 to 8 feet into the ground. The sun is your source of warmth and, of course, your plants need sunlight to grow. Ideally, build a subterranean greenhouse in a south-facing location if you can.
The very first thing to consider is your local water table. Areas with a high water table or low-lying areas prone to flooding are not ideal, as you want your greenhouse to be fairly dry.
Once you determine your positioning, you’re ready to begin.
Dig out your space. Like most gardens, there is no “right” size. You can grow a lot of food in an 8×10-foot garden, but remember, the most expensive part of this is likely hiring someone to dig the hole, so it’s not going to be much more expensive to go with something 10×12-foot or larger.
You don’t have to finish the space, since one of the primary points of a subterranean greenhouse is that the earth acts as an insulator. But do pack the walls enough so they are sturdy.
Next, using stones or cinderblocks, build up the back of the subterranean greenhouse a foot or two. You want the roof to be at around a 45-degree angle to the sun’s rays so you can get plenty of light and warmth in the space. Then make your roof.
Once you get the lumber in place, you’re going to attach two sheets of clear plastic. The first layer of plastic will be on the top side of the ceiling lumber and the second layer will be underneath. That creates an insulating layer and helps maintain warmth in the space.
Now lay down a layer of rocks and gravel for drainage, followed by a layer of topsoil. At this point, you can decide on raised beds or containers, but you should have a relatively stable environment for your plants.
That’s your basic subterranean greenhouse. However, there are still some things to take into consideration.

7 things to consider before you build
1. Expense/labor: While the supplies are generally inexpensive as compared to an above-ground greenhouse, you will need to hire someone with a backhoe to dig out the space for you. Unless, that is, you really enjoy digging and don’t mind the idea of shoveling around 400 cubic feet of earth (or more).
2. Supplies: The nice thing about a subterranean greenhouse is that you don’t need very many supplies. You just need enough lumber to construct a roof, two layers of clear plastic sheeting to cover the roof (insulated greenhouse glass or two layers of plexiglass are also good options), a layer of gravel, and either a layer of topsoil or material for raised beds.
3. Latitude: Locations further north (or south if you’re in the Southern Hemisphere) will want a greater roof angle to get more sunlight.
4. Snow: If you get a lot of snow, you may want to consider opting for insulated glass or a double layer of plexiglass for more stability.
5. Soil: Some loose soil conditions may also require some bolstering for stability. You still want those earthen walls, but it might require some support beams and chicken wire. Another way you can approach this is to dig the walls at an angle, with the top of the wall angled out away from the bottom.
6. Heating: As efficient as a subterranean greenhouse is, if you’re in an especially cold climate, you still may need to add a small heating system or portable heater in the coldest months.
7. Ventilation: Lastly, ventilation is also important, especially if there’s a significant amount of moisture in your greenhouse, which can cause fungus gnats, amongst other things. Again, you have some options, though leaving the door open in warmer conditions might be enough to take care of this.
Helpful supplies
If you do need some additional supplies, here are a few that you might find helpful.
- Twin Wall 8mm Polycarbonate Panel, Clear, Strong Impact and Shatterproof, All-Weather Outdoor Greenhouse Covering
- SoulVolve Solar Panel Exhaust Fan, Ventilation Extractor with Anti-backflow Check Valve Chain Switch
Have you built a subterranean greenhouse? I’d love to read about your experience.
[affiliate_note]


Discover 7 top tips for growing, harvesting, and enjoying tomatoes from your home garden—when you access the FREE guide The Best Way to Grow Tomatoes, right now!